How To
How to Back Up Your Files and Which Ones To Back Up Regularly

- November 18, 2020
- Updated: July 2, 2025 at 4:16 AM
You may not be aware of it, but you save a huge amount of data on your hard drive every day, including irreplaceable files that you would never want to lose. Photos from your recent vacation, your wedding video, sensitive work emails, sessions of your favorite games… You probably don’t spend too much time thinking about it, but your hard drive is like a little safe that holds a large part of your life. But are all your files truly safe?
The answer is no. Files saved on your PC are not as safe as you might assume, and in fact, any unexpected error, power outage or virus could corrupt everything you have, wiping away your memories. Fortunately, there’s a way to keep your files safe: creating a backup of your PC.
In today’s article, we’ll walk you through the steps to create a system image of your Windows 10 computer. Don’t worry, because the process is easy and requires no prior IT knowledge. Let’s have a look!
What is a backup?
A backup is a copy of your documents and files that you can create in order to restore them in case of emergency. It’s especially useful for recovering files that have been corrupted or deleted by mistake, or, for example, restoring your computer after reverting to factory settings.
Essentially, there are two kinds of backups you can create: a backup of the files stored on your computer or a full system backup. The first option saves your personal documents (photos, emails, videos, etc.), and the second one creates an exact image of your OS that can be transferred to an empty computer.
Whether you want to back up files or your entire system, you’ve come to the right place. Keep on reading to find out how to do both things!
How to back up your personal files on Windows 10
Windows 10 has its own tool to back up personal files, and it’s quite easy to use. Called “File History,” it lets you back up your personal data on a regular basis in a matter of seconds.
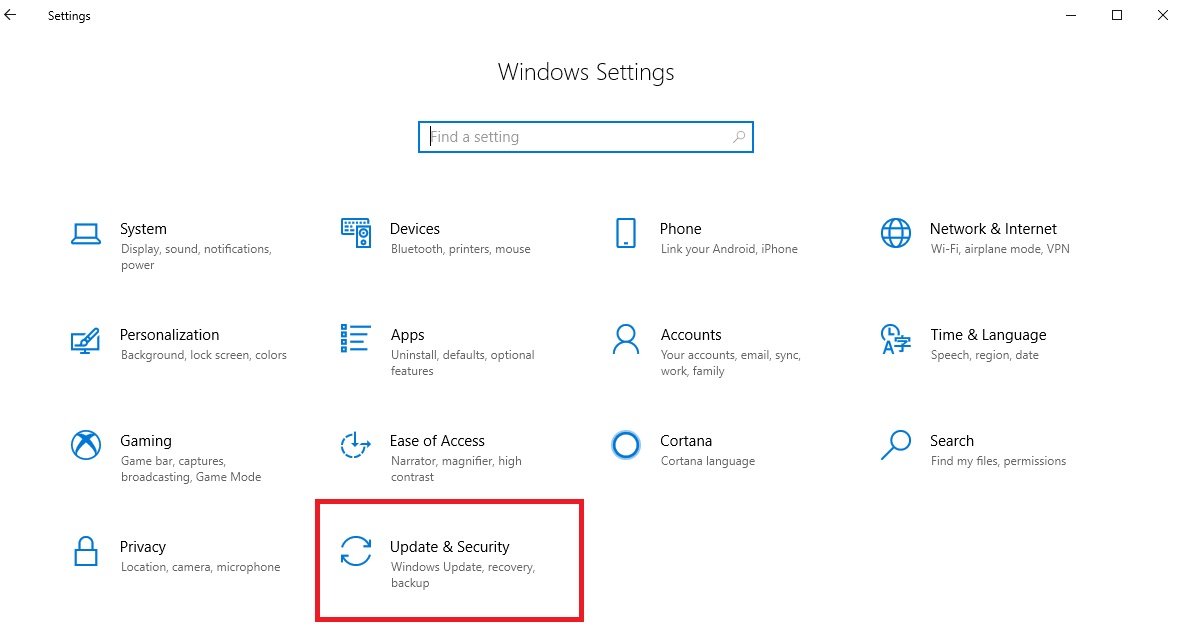
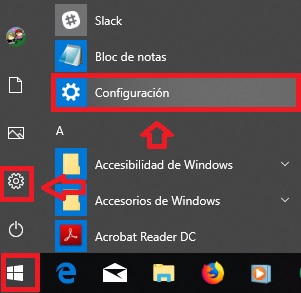
To access File History, first go to the Settings menu (Windows key + I) and then select the “Update & Security” option.
Next click “Backup” in the menu on the left side of the screen. When the window opens, select “Add a drive,” which you’ll find under “Back up using File History.”
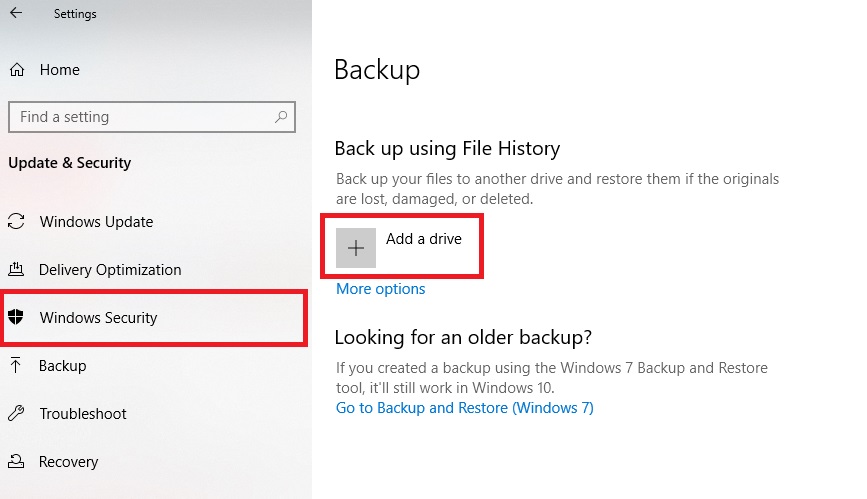
Click there, and a menu will appear on the left side with all the external hard drives connected to your computer right now. Choose one to save your backup on. Then Windows 10 will automatically copy all the files you have stored on your PC.
If you prefer, you can create your backup manually by selecting “More options” followed by “Back up now.”
On the same screen, you can choose how frequently you want to back up your files and which folders you want to include in your Windows 10 backup.
How to restore personal files from your backup
Now that you have your files backed up, we’re going to teach you how to restore them. Not to worry, the process is easy and intuitive!
To restore any file saved in File History, go to Start (the button with the Windows icon on the lower left side of your screen). Then type “Restore files with File History” and click on the result that Windows displays.
In the next window, you’ll see your backups listed by date. You can browse through them using the arrow icons at the bottom of the window.
Once you find your copy, you can fully restore it, or if you prefer, only restore the file you need.
Where can I store the backup copies of my files?
The best place to store backup copies of your files is an external hard drive, but a cloud storage service is also an option. Both have their pros and cons. Keep reading to find out what they are!
External hard drives are great for storing your files in a physical location where they can be accessed anytime, without needing to connect to the internet. Besides being durable and easy to use, this option gives you the peace of mind of knowing exactly where your files are and that they’ll never disappear on you.
You can buy a hard drive for a great price by searching online or checking out the options on Amazon.

Also, be sure to read our article below with a roundup of the best budget external hard drives in the market today.

The best low-cost external hard drives (2018)
READ MORECloud storage services are another great option for keeping your backups safe. They’re convenient because you can access your files on any device with an internet connection. That makes them a perfect option for storing work files that you need to be able to access at home or the office.
There are many excellent cloud storage services. You can find our favorite ones below.
- Dropbox
- Google Drive
- Microsoft OneDrive
Due to its user-friendliness and great performance, we recommend using Google’s cloud storage service, Drive. You can find an in-depth article on how to use Google Drive to create backups below.

How to back up files on the Cloud with Google Drive
READ MOREWhat are the main types of files I should back up?
Now that you know how to back up your files and where to store them, we’re going to look at what kinds of files you should back up.
First of all, there are personal files, that is, your photos, documents, music, etc. Usually you can find them under”C:\Users\Your username” and saved in the corresponding folder (Photos, Documents and Music).
Also, we strongly suggest backing up your AppData folder, which contains the settings of all the programs, applications and games on your PC.
And don’t forget to back up important emails, such as sensitive work emails and personal messages.
Finally, make sure to back up any essential files for projects you are working on. For example, edited videos, photos or work files.
In short, use your common sense when deciding which files on your computer are important in your life, and which ones would mean a big personal loss if you couldn’t recover them. Once you have identified them, add them to your list of files so Windows can back them up regularly.
How to create a system restore point in Windows 10
If you’re looking to protect your operating system files, Windows 10 has an easy tool for creating backups in the blink of an eye. We’re talking about system restore points.
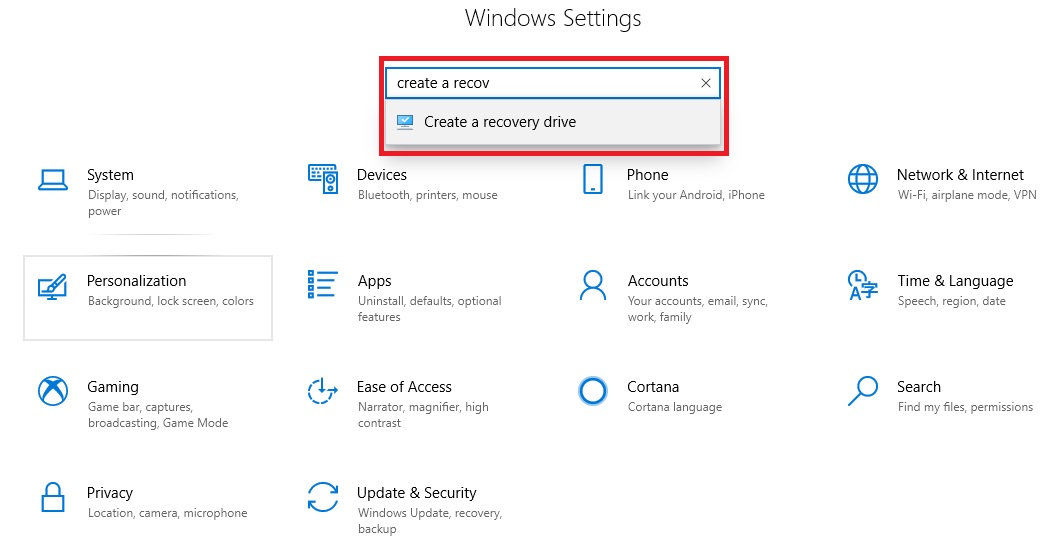
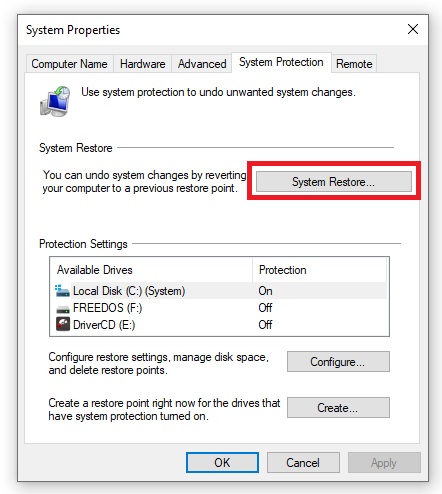
To create a restore point in Windows 10, first open the Settings menu (Windows key + I). Then type “restore point” and click the result that comes up.
When the System Properties window opens, click the “System Protection” tab and the “Create” button.
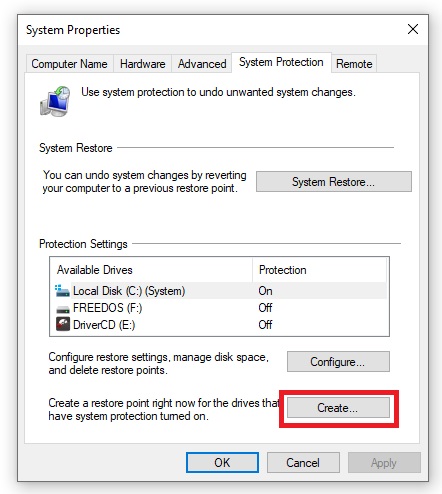 If this option appears inactive, first select “Configure” to activate it. Ta-da! Your operating system backup is finished.
If you’re still feeling lost, be sure to check out our guide so we can walk you through all the steps.
Windows 10: How to create a System Restore
READ MOREHow to revert your computer to a system restore point
Reverting your computer to an earlier point is very easy. Just follow the steps described above, and in the System Property window, select “System Restore.”
 In the new window, Windows will ask you if you want to revert your computer to the point before your last program installation or to an earlier point.
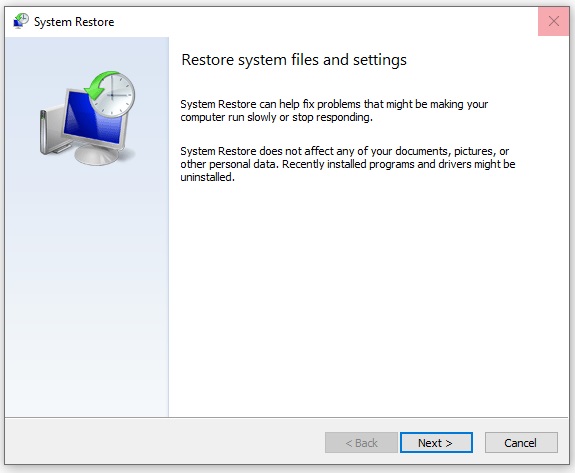
Select a system restore point and click “Next.” Now all you have to do is wait for Windows to work its magic and restart your computer. Once the process is finished, your system will be reverted to your chosen point.
We hope our guide on how to back up your files has been helpful to you. What are some of the files on your PC that you couldn’t live without? Tell us about them in the comments section!

How to download documents from Google Drive for offline use
READ MORE
Latest from Softonic Editorial Team
You may also like
 News
NewsIf your company has hired a spy from North Korea, this is what you should do according to cybersecurity experts
Read more
 News
NewsIt was announced twelve years ago, but the filming of the movie based on one of Ubisoft's most controversial franchises has just been completed
Read more
 News
NewsSplinter Cell has an upcoming series on Netflix, but if you can't wait, we have some novels to recommend to you
Read more
 News
NewsSilent Hill f has not officially been released yet and it already has a mod to remove the most distinctive feature of the franchise
Read more
 News
NewsIf you like Pixar and you like farming games, a game made specifically for you has been presented at the Tokyo Game Show
Read more
 News
NewsDisney+ raises the price of its subscription again after a bitter controversy that shook the entire US
Read more