Install something you immediately regret? Wishing you could travel back in time a just a couple days, or even a couple hours? Windows 10 lets you do that with the System Restore feature.

Using a System Restore is like going back to a save point in a video game – this safety net feature is designed so that if everything suddenly goes wrong after a program install, update, changes in registry, settings, applications, drivers or system files, you’ve got a way to revert back to that place and time where things were working smoothly. It’s incredibly handy, can manually pull the plug on a number of frustrating alterations that you’re not sure how landed there in the first place.
Though the feature is turned off by default, Windows 10 can actually create checkpoints automatically if you’re not confident that you’ll remember to do it yourself. This is mostly helpful for Windows users who frequently encounter bugs or faulty configurations as a result of updates or radical system changes.
Note: This guide will be focused on Windows 10, but the process we walk you through will be practically identical on Windows 7 or Windows 8.1. Before you jump in and enable System Restore settings, it would be wise to first check whether automatic System Restore Points are already enabled on your computer. Here’s how to do precisely that.
How to create a System Restore on Windows 10
Check your System Restore settings
1. Hit the Win key or click the start menu icon and type “restore.” The first option that comes up will be to Create a Restore Point. Select that.

2. From here, you’ll be taken to the System Properties window where you can also find a bunch of helpful information. You can join work groups or domains, rename your computer, manage and install devices, access debugging information, and allow or prohibit remote assistance connections to your PC. You should start off under the System Protection tab, though, and that’s all we’ll be needing to create Restore points.
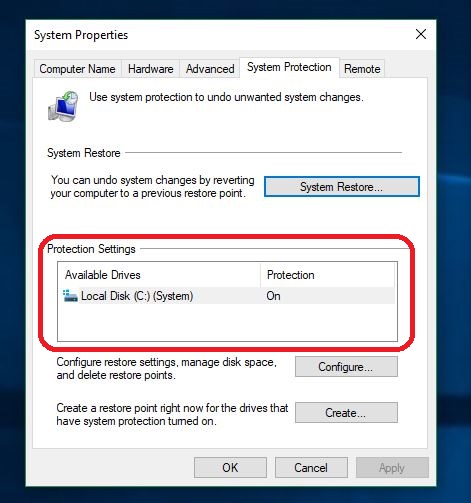
3. To find out whether your PC is currently making automatic System Restore points, simply look in the Protection Settings window and see whether your drive(s) are turned on. Unless you’ve manually disabled it in the past, they should be enabled by default. If they are off and you wish to turn them back on, however, it’s as easy as clicking Configure under the Protection Settings Window and checking Turn on system protection.
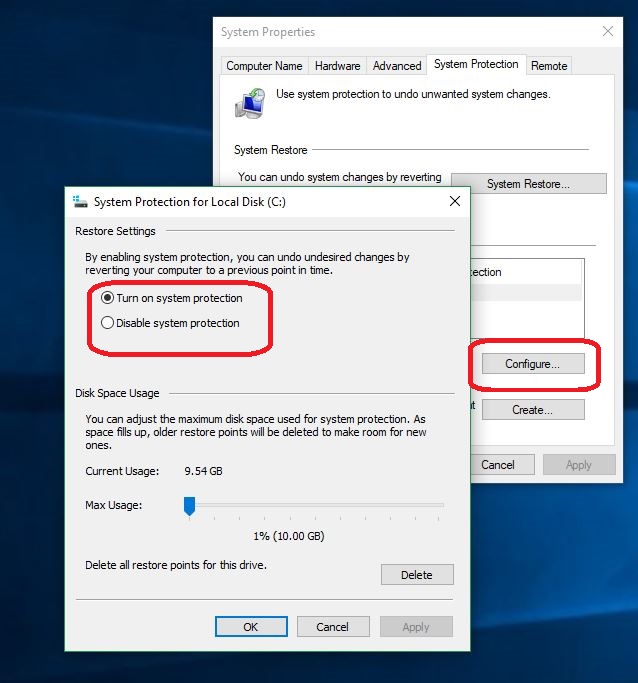
Just hit Apply, then OK, and now your computer will automatically create Restore points whenever important system changes occur, i.e. before you install a new Windows update.
And that’s it!
Manually create a Restore point
If you’re a wary PC user (like us), manually creating Restore points will be your new favorite backup method. The process for creating your own is done through the same System Properties menu we showed you in our last point, so …
1. Open your System Properties menu by hitting the Win key, typing restore, and clicking on the Create a Restore Point option.
2. Under the System Protection tab, you’ll see Create as the bottom option under Configure. Click this and it will open a new window.
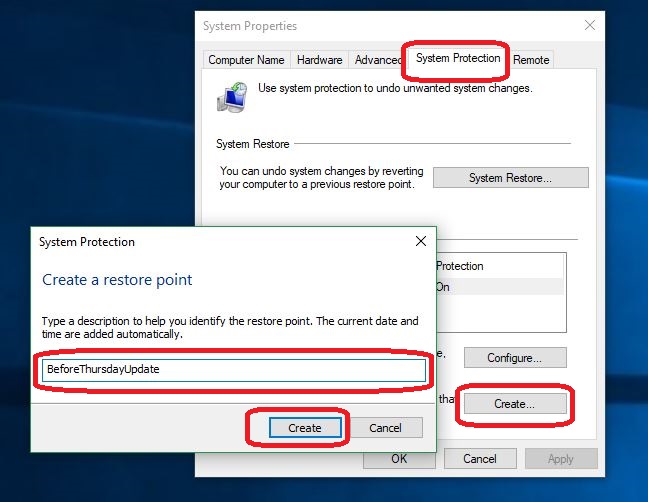
3. Give your Restore point an apt name, and hit Create. Now you’ll have a saved version of the current state of your computer that you can go back to if any issue arises!
Using your Restore point
So something went wrong? Good thing you made that Restore point, right? Here’s how to revert to it:
1. Open your System Properties menu and go under the System Protection tab (if you don’t know where to find this, check out our earlier points).
2. Click System Restore and it will open a new window. Here, you’ll be presented with a recommended restore, and another option below it that lets you manually select a different point, such as the one you manually created.
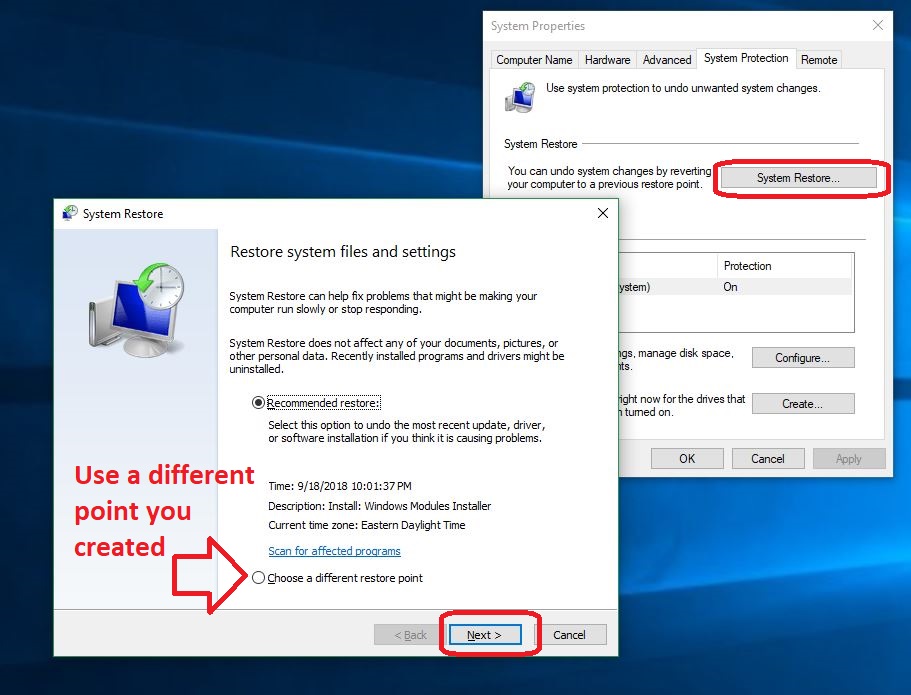
3. Click Next. If you want to pick a Restore point besides the recommended one, clicking Next will present you with a window that asks which you’d like. Don’t see yours there? Check the box that says Show more restore points.

4. Choose the Restore point that you wish to use. This will open a window that shows you exactly what will be deleted. Check to be sure that you’ll be eliminating the culprit should you choose to restore to this point. If you will be, hit Next again.
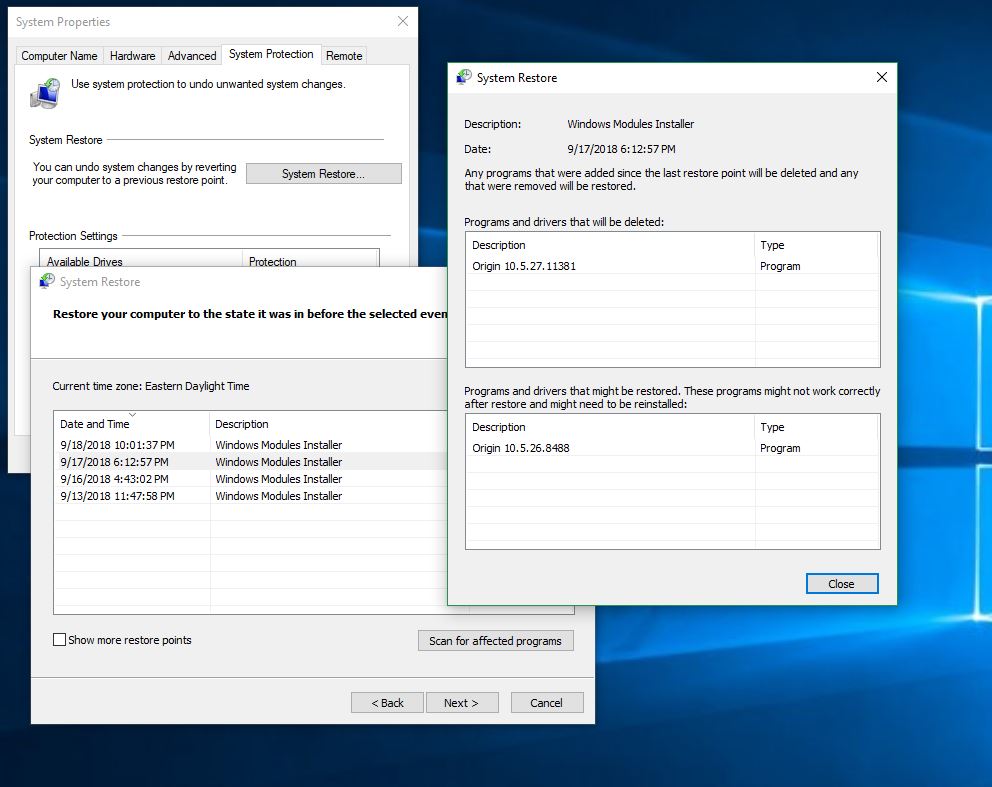
5. You’ll now be on the final screen of the Restore process. Here it will verify exactly when you’ll be restoring your PC to. Confirm that everything it’ll be doing is desired, then click Finish. Let the computer run its magic and in about 30-45 minutes your Windows files and settings will be restored to the way they were at the time of the Restore point you chose.
Create a shortcut that restores your PC
If you find yourself frequently using the System Restore function to create backup points, you might consider creating a desktop shortcut that does this for you. The process to do this is as follows:
1. Right-click your desktop
2. Select New > Shortcut
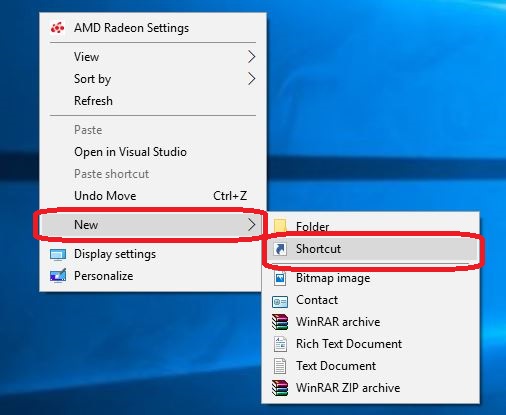
3. This will open a window where you get to choose the location of the item you’re linking your shortcut to. In the window, paste the following:
cmd.exe /k “wmic.exe /Namespace:\\root\default Path SystemRestore Call CreateRestorePoint “My Shortcut Restore Point”, 100, 7″
This code will open cmd and use WMIC to create a Restore point.
4. Name your shortcut something you’ll recognize (you can also rename it later by clicking the shortcut and hitting F2)
5. Right-click on the new shortcut and click Properties
6. Under the Shortcut tab, click Advanced.
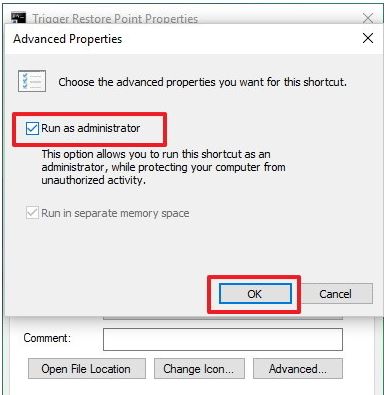
7. Check the box that says Run as administrator. This will ensure that your PC makes the point both faster and without hassle.
8. Click Apply, then OK.
With all this in mind, it’s also worth mentioning that System Restore might not be supported on your drive! If you’re operating with multiple drives there’s a chance that configuring them will not be possible. In that event check your drives under the System Properties window just to see which of your drives are compatible with this feature.
We hope this guide has been helpful, and that you’ll be able to use System Restore to keep your PC running smoothly and safely.